Mostrando entradas con la etiqueta maya. Mostrar todas las entradas

domingo, 13 de abril de 2014

Pixel Offset Tool For Maya

This tool presents a simple rig and a Heads Up Display for  measuring the pixel offset in ths stereo pair for 3 points in worldspace. This is very useful for checking stereo to be inside the safe stereo zone, and also to make transitions between shots having different stereo settings.
This should work in many maya versions, since it uses the python api and not the c++ api.

Instalation

  1. Unzip the zip file pixelOffset_v0.0.zip.
  2. Exit maya (all instances!
  3. Copy 'cgipipeline' folder and and '__init__.py' file to C:\Users\Documents\maya\scripts
  4. copy 'shelf_PixelOffset.mel' file to C:\Users\Documents\maya\prefs\shelves
  5. Start Maya
  6. Enjoy! ( Hopefully ;) )

How To Use

After the instalation, you will find a new shelf in your maya sesion, you can start the pixel offset tool by clicking the the button in the pixelOffset shelf.

A window will open, where you have to enter the names of the left, center and right camera.
You can also select the cameras one by one and press the button to de right of the text field.


After having all the fields completed, you have to push the button 'Add pixel offset locators and HUD'. Then 3 locators will appear, that you can move around in the scene, that will be used for measures. Also a Heads Up Display will appear that will reflect the measures for each locator, plus some stereo settings for the camera. I've also added a plane that moves relative to the camara that represents the position of the locator in the camara axis. This is usefull to see what objects are in front or behind that plane. The planes are color coded, background is green, action is blue, and foreground is yellow.


In the HUD, zp is zeroParalax, ia is interaxial, fg is the 'foreground' locator, ac is the 'action' locator (center) and bg is 'background' locator. The numbers presented is in percentage of screen size.


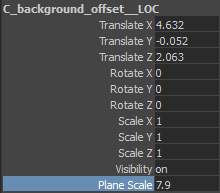
 You can edit the size of each plane with the 'Plane Scale' attribute on each locator.
With the 'Remove pixel offset Hud' you can turn off the HUD but keeping the locators. (you can get the HUD back by hitting the 'Add pixel offset locators and HUD' button again)
The same happens with the 'Remove pixel offset Planes' button, you can remove the planes but keeping the locators.
With the 'Remove pixel offset Setup' button you can remove everything, including the locators.
Hope this is usefull, and please let me know how it goes!

Eduardo.

lunes, 12 de noviembre de 2012

IacoTrack , Mayo to After Effects export

Hello! Welcome to the Iaco Track official web page! ;)

Here i'll put some web help, and collect some comments on this simple tool i wrote on python.

The purpose of this tool is to export x and y coordinates of a 2d projection of an object in 3d in maya, and to present them in a format that After Effects can understand. So far i've implemented a mode for corner pin effect and for a null layer, although i still need to test the null layer mode a little bit more.

 This is the ui so far.


In each ui element you have an annotation that appears when you hover over them with the mouse.

 When you open the ui, all the scene related info should appear already filled for you. All you have to do, is tweak it in case you need to. You can also change the secne and hit the 'reload Scene Satatus' and the changes on the scene will be reflected by the ui.

What you have to do for sure is select the tab according to what you need to export to, and then fill the fields of the inputs that you option needs.

To fill this fields, enter the object name, or select it in the viewport and hit the button next to the field.

When you have all the fields completed, hit th Go! button. You will see maya going through the frame range specified, calculating the position of the objects in the raster space of the camera you chosen.
Then, a txt file will pop up in notepad, you have to copy the text file content and paste it into after effects objects keys.
Remember that the txt file is saved at the path you specified in the ui.

Any questions, please drop me a line!
eduardo at eduardograna.com.ar
( if you are human you will understan you have to replace the 'at' for @,
i'm just trying to confuse the spambots )

Well, that's pretty much it!

Cheers! Eduardo
www.eduardograna.com.ar

viernes, 10 de septiembre de 2010

This is a really cheap face capture!

Hey, I was messing around with a webcam and some sticker,
and the result was quite fun...
The face rig is from Jason Osipa!
Cheers,
Eduardo

cheapest mocap ever from eduardo grana on Vimeo.

domingo, 5 de septiembre de 2010

RZ2 importer script for autodesk maya


Hey, I made this to import 2d tracks ( .RZ2 files )from movimento 1.0,
feel free to use it if you need it!
Of course it's super beta version, documentation is non existing and feedback is super welcome!

eg_movi.zip

Quick help: press the button with the ... to browse for the rz2 file. The List will show you the tracking points you have in the file.
Select the ones you want to import and click import selected, or click Select all to import all listed.
You have options for adding a prefix (in case you want to import some point more than once without having name clashes), scale the movement of the points, change the start frame for the animation, flip y axis (screen coordinates are flipped on y) and you can choose to make locators or trackPoints with the data.
On top it shows the current time unit, if you right click it, you have a popup menu to change it with or without compensating the keyframes (very handy!!)
aaa! almost forgot...
to run it:
source "c:/fullPathToTheScript/eg_movi.mel";
eg_movi;

Cheers!
Eduardo.

miércoles, 10 de septiembre de 2008

Gaturro in Autodesk Siggraph Show Reel

The manofacturer of Maya, Autodesk, is using the render test we did at Illusion Studios for "Gaturro" in the Show Reel they Showed at Siggraph 2008 in Los Angeles!
We are really proud of this beacause the other companies that succeded in puting their job in that reel are awesome. We are talking of international companies like MPC, Blur, Franctic Films, CafeFX etc.
You can see the reel in this link to Autodesk