Depurator is a tool for finding frame sequences and transform them into quicktime movies with the codec of your choice.
More help coming soon!
miércoles, 14 de mayo de 2014
domingo, 13 de abril de 2014
Pixel Offset Tool For Maya
This tool presents a simple rig and a Heads Up Display for measuring the pixel offset in ths stereo pair for 3 points in worldspace. This is very useful for checking stereo to be inside the safe stereo zone, and also to make transitions between shots having different stereo settings.
This should work in many maya versions, since it uses the python api and not the c++ api.
A window will open, where you have to enter the names of the left, center and right camera.
You can also select the cameras one by one and press the button to de right of the text field.
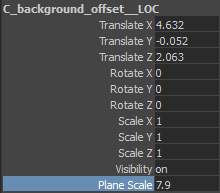
After having all the fields completed, you have to push the button 'Add pixel offset locators and HUD'. Then 3 locators will appear, that you can move around in the scene, that will be used for measures. Also a Heads Up Display will appear that will reflect the measures for each locator, plus some stereo settings for the camera. I've also added a plane that moves relative to the camara that represents the position of the locator in the camara axis. This is usefull to see what objects are in front or behind that plane. The planes are color coded, background is green, action is blue, and foreground is yellow.
The same happens with the 'Remove pixel offset Planes' button, you can remove the planes but keeping the locators.
With the 'Remove pixel offset Setup' button you can remove everything, including the locators.
Hope this is usefull, and please let me know how it goes!
Eduardo.
This should work in many maya versions, since it uses the python api and not the c++ api.
Instalation
- Unzip the zip file pixelOffset_v0.0.zip.
- Exit maya (all instances!
- Copy 'cgipipeline' folder and and '__init__.py' file to C:\Users
\Documents\maya\ scripts - copy 'shelf_PixelOffset.mel' file to C:\Users\
Documents\maya\ prefs\shelves - Start Maya
- Enjoy! ( Hopefully ;) )
How To Use
After the instalation, you will find a new shelf in your maya sesion, you can start the pixel offset tool by clicking the the button in the pixelOffset shelf.A window will open, where you have to enter the names of the left, center and right camera.
You can also select the cameras one by one and press the button to de right of the text field.
After having all the fields completed, you have to push the button 'Add pixel offset locators and HUD'. Then 3 locators will appear, that you can move around in the scene, that will be used for measures. Also a Heads Up Display will appear that will reflect the measures for each locator, plus some stereo settings for the camera. I've also added a plane that moves relative to the camara that represents the position of the locator in the camara axis. This is usefull to see what objects are in front or behind that plane. The planes are color coded, background is green, action is blue, and foreground is yellow.
In the HUD, zp is zeroParalax, ia is interaxial, fg is the 'foreground' locator, ac is the 'action' locator (center) and bg is 'background' locator. The numbers presented is in percentage of screen size.
You can edit the size of each plane with the 'Plane Scale' attribute on each locator.
With the 'Remove pixel offset Hud' you can turn off the HUD but keeping
the locators. (you can get the HUD back by hitting the 'Add pixel offset
locators and HUD' button again)The same happens with the 'Remove pixel offset Planes' button, you can remove the planes but keeping the locators.
With the 'Remove pixel offset Setup' button you can remove everything, including the locators.
Hope this is usefull, and please let me know how it goes!
Eduardo.
Etiquetas:
disparity,
maya,
pixel offset,
safe stereo,
stereo,
tools
domingo, 6 de abril de 2014
Folderazo!
Folder and Files template for projects
This simple tool addresss what i think is the most elemental fundation for production pipelines.
Folder and Files naming conventions. This is a starting point on top of wich you can build a lot of stuff to get your studio running better and more eficiently.
This tool works by defining a template first, where you specify the possible project root folders, then you define your assets, their folders and files as relative paths, and with some variables that you define later in the template. The ui of the tool will read this template and put in place the widgets for you to create the projects and assets in a simple way.
You can have as many templates as you want, and you can switch between them.
You can have as many templates as you want, and you can switch between them.
Etiquetas:
convention,
file,
folder,
naming,
pipeline,
python pyqt template project,
tools,
workflow
Suscribirse a:
Comentarios (Atom)

