Depurator is a tool for finding frame sequences and transform them into quicktime movies with the codec of your choice.
More help coming soon!
miércoles, 14 de mayo de 2014
domingo, 13 de abril de 2014
Pixel Offset Tool For Maya
This tool presents a simple rig and a Heads Up Display for measuring the pixel offset in ths stereo pair for 3 points in worldspace. This is very useful for checking stereo to be inside the safe stereo zone, and also to make transitions between shots having different stereo settings.
This should work in many maya versions, since it uses the python api and not the c++ api.
A window will open, where you have to enter the names of the left, center and right camera.
You can also select the cameras one by one and press the button to de right of the text field.
After having all the fields completed, you have to push the button 'Add pixel offset locators and HUD'. Then 3 locators will appear, that you can move around in the scene, that will be used for measures. Also a Heads Up Display will appear that will reflect the measures for each locator, plus some stereo settings for the camera. I've also added a plane that moves relative to the camara that represents the position of the locator in the camara axis. This is usefull to see what objects are in front or behind that plane. The planes are color coded, background is green, action is blue, and foreground is yellow.
The same happens with the 'Remove pixel offset Planes' button, you can remove the planes but keeping the locators.
With the 'Remove pixel offset Setup' button you can remove everything, including the locators.
Hope this is usefull, and please let me know how it goes!
Eduardo.
This should work in many maya versions, since it uses the python api and not the c++ api.
Instalation
- Unzip the zip file pixelOffset_v0.0.zip.
- Exit maya (all instances!
- Copy 'cgipipeline' folder and and '__init__.py' file to C:\Users
\Documents\maya\ scripts - copy 'shelf_PixelOffset.mel' file to C:\Users\
Documents\maya\ prefs\shelves - Start Maya
- Enjoy! ( Hopefully ;) )
How To Use
After the instalation, you will find a new shelf in your maya sesion, you can start the pixel offset tool by clicking the the button in the pixelOffset shelf.A window will open, where you have to enter the names of the left, center and right camera.
You can also select the cameras one by one and press the button to de right of the text field.
After having all the fields completed, you have to push the button 'Add pixel offset locators and HUD'. Then 3 locators will appear, that you can move around in the scene, that will be used for measures. Also a Heads Up Display will appear that will reflect the measures for each locator, plus some stereo settings for the camera. I've also added a plane that moves relative to the camara that represents the position of the locator in the camara axis. This is usefull to see what objects are in front or behind that plane. The planes are color coded, background is green, action is blue, and foreground is yellow.
In the HUD, zp is zeroParalax, ia is interaxial, fg is the 'foreground' locator, ac is the 'action' locator (center) and bg is 'background' locator. The numbers presented is in percentage of screen size.
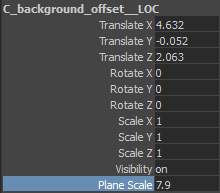
You can edit the size of each plane with the 'Plane Scale' attribute on each locator.
With the 'Remove pixel offset Hud' you can turn off the HUD but keeping
the locators. (you can get the HUD back by hitting the 'Add pixel offset
locators and HUD' button again)The same happens with the 'Remove pixel offset Planes' button, you can remove the planes but keeping the locators.
With the 'Remove pixel offset Setup' button you can remove everything, including the locators.
Hope this is usefull, and please let me know how it goes!
Eduardo.
Etiquetas:
disparity,
maya,
pixel offset,
safe stereo,
stereo,
tools
domingo, 6 de abril de 2014
Folderazo!
Folder and Files template for projects
This simple tool addresss what i think is the most elemental fundation for production pipelines.
Folder and Files naming conventions. This is a starting point on top of wich you can build a lot of stuff to get your studio running better and more eficiently.
This tool works by defining a template first, where you specify the possible project root folders, then you define your assets, their folders and files as relative paths, and with some variables that you define later in the template. The ui of the tool will read this template and put in place the widgets for you to create the projects and assets in a simple way.
You can have as many templates as you want, and you can switch between them.
Etiquetas:
convention,
file,
folder,
naming,
pipeline,
python pyqt template project,
tools,
workflow
lunes, 12 de agosto de 2013
domingo, 16 de junio de 2013
YPF Ases al Volante
I did some rigging, dynamic simulations and some pipeline tools working for LaSP
Chapter1:
LASP YPF Ases al Volante cap01 from La Sociedad Post (LaSP) on Vimeo.
Chapter2:
LASP_YPF_Ases al Volante_Cap02 from La Sociedad Post (LaSP) on Vimeo.
Chapter 3:
YPF // Ases al Volante - Spot 3 from Emiliano Enriquez on Vimeo.
Chapter 5:
YPF // Ases al volante - Spot 5 from Emiliano Enriquez on Vimeo.
Chapter 7:
YPF // Ases al volante - Spot 7 from Emiliano Enriquez on Vimeo.
Chapter 8:
YPF // Ases al volante - Spot 8 from Emiliano Enriquez on Vimeo.
Teaser:
YPF // Casting Robi from Emiliano Enriquez on Vimeo.
I did some rigging, dynamic simulations and some pipeline tools working for LaSP
Chapter1:
LASP YPF Ases al Volante cap01 from La Sociedad Post (LaSP) on Vimeo.
Chapter2:
LASP_YPF_Ases al Volante_Cap02 from La Sociedad Post (LaSP) on Vimeo.
Chapter 3:
YPF // Ases al Volante - Spot 3 from Emiliano Enriquez on Vimeo.
Chapter 5:
YPF // Ases al volante - Spot 5 from Emiliano Enriquez on Vimeo.
Chapter 7:
YPF // Ases al volante - Spot 7 from Emiliano Enriquez on Vimeo.
Chapter 8:
YPF // Ases al volante - Spot 8 from Emiliano Enriquez on Vimeo.
Teaser:
YPF // Casting Robi from Emiliano Enriquez on Vimeo.
Etiquetas:
dynamic simulation,
pipeline tools,
rigging
Warranty Direct!
I did all the rigging for this lovely piece working for united skills.
Warranty Direct from Koala Limited on Vimeo.
Warranty Direct 'Timing' from Koala Limited on Vimeo.
Hope you like it!
Cheers,
Eduardo
I did all the rigging for this lovely piece working for united skills.
Warranty Direct from Koala Limited on Vimeo.
Warranty Direct 'Timing' from Koala Limited on Vimeo.
Hope you like it!
Cheers,
Eduardo
Etiquetas:
rigging,
united skills,
warranty direct
viernes, 14 de junio de 2013
ProRes Creator
Hello!
This is the Pro Res Creator Tool webpage.
This tools is intended to convert video or an image sequence to a prores codec on windows platform.
The output is a quicktime movie that will behave as if it was coded on an mac machine.
It uses FFMPEG as its encoder, and is a portable app of 30 something megabytes.
Soon I'll add the full documentation here.
If you are interested in an app like this, please drop me a line to eduardo.grana at gmail
This is the Pro Res Creator Tool webpage.
This tools is intended to convert video or an image sequence to a prores codec on windows platform.
The output is a quicktime movie that will behave as if it was coded on an mac machine.
It uses FFMPEG as its encoder, and is a portable app of 30 something megabytes.
Soon I'll add the full documentation here.
If you are interested in an app like this, please drop me a line to eduardo.grana at gmail
lunes, 12 de noviembre de 2012
IacoTrack , Mayo to After Effects export
Hello!
Welcome to the Iaco Track official web page! ;)
Here i'll put some web help, and collect some comments on this simple tool i wrote on python.
The purpose of this tool is to export x and y coordinates of a 2d projection of an object in 3d in maya, and to present them in a format that After Effects can understand. So far i've implemented a mode for corner pin effect and for a null layer, although i still need to test the null layer mode a little bit more.
This is the ui so far.
In each ui element you have an annotation that appears when you hover over them with the mouse.
When you open the ui, all the scene related info should appear already filled for you. All you have to do, is tweak it in case you need to. You can also change the secne and hit the 'reload Scene Satatus' and the changes on the scene will be reflected by the ui.
What you have to do for sure is select the tab according to what you need to export to, and then fill the fields of the inputs that you option needs.
To fill this fields, enter the object name, or select it in the viewport and hit the button next to the field.
When you have all the fields completed, hit th Go! button. You will see maya going through the frame range specified, calculating the position of the objects in the raster space of the camera you chosen.
Then, a txt file will pop up in notepad, you have to copy the text file content and paste it into after effects objects keys.
Remember that the txt file is saved at the path you specified in the ui.
Any questions, please drop me a line!
eduardo at eduardograna.com.ar
( if you are human you will understan you have to replace the 'at' for @,
i'm just trying to confuse the spambots )
Well, that's pretty much it!
Cheers! Eduardo
www.eduardograna.com.ar
Here i'll put some web help, and collect some comments on this simple tool i wrote on python.
The purpose of this tool is to export x and y coordinates of a 2d projection of an object in 3d in maya, and to present them in a format that After Effects can understand. So far i've implemented a mode for corner pin effect and for a null layer, although i still need to test the null layer mode a little bit more.
This is the ui so far.
In each ui element you have an annotation that appears when you hover over them with the mouse.
When you open the ui, all the scene related info should appear already filled for you. All you have to do, is tweak it in case you need to. You can also change the secne and hit the 'reload Scene Satatus' and the changes on the scene will be reflected by the ui.
What you have to do for sure is select the tab according to what you need to export to, and then fill the fields of the inputs that you option needs.
To fill this fields, enter the object name, or select it in the viewport and hit the button next to the field.
When you have all the fields completed, hit th Go! button. You will see maya going through the frame range specified, calculating the position of the objects in the raster space of the camera you chosen.
Then, a txt file will pop up in notepad, you have to copy the text file content and paste it into after effects objects keys.
Remember that the txt file is saved at the path you specified in the ui.
Any questions, please drop me a line!
eduardo at eduardograna.com.ar
( if you are human you will understan you have to replace the 'at' for @,
i'm just trying to confuse the spambots )
Well, that's pretty much it!
Cheers! Eduardo
www.eduardograna.com.ar
Etiquetas:
2d,
After Effects,
autodesk,
corner pin,
maya,
pyhton,
track
martes, 1 de marzo de 2011
Aditional Rigging for Fravega
Once again teamed up with Reino, this time for Fravega commercial. This time i helped them speed up their character pipeline by skinning most of the humar character. Congrats again to Niko Rossi and all the crew at Reino!
You can see the add in HD in this link on youtube.
sábado, 1 de enero de 2011
Pipeline and Workflow Talk at DaVinci
Last month Ramon Giraldez, Lorenzo Basurto and I gave a talk at DaVinci school. It was about adjusting your pipeline and workflow to the size of your production, and why is it so important to have the right pipeline.
I couldn't find the video on the website , but maybe you can! (Please let me know if you do) .
Etiquetas:
davinci,
Lorenzo Basurto,
news,
pipeline,
Ramon Giraldez
miércoles, 1 de diciembre de 2010
Mel Mentor at Reino
Some time ago, my friend Niko Rossi told me he wanted to write and automated rigging tool, so we arrenged with Reino a 6 month intensive mel course. I had a great time, and it was amazing how quickly Niko was up and running!
You can see some of his tools in his website link .
lunes, 1 de noviembre de 2010
Tools for Catmandu
I'm currently working full time at Catmandu coding some tools, because Catmandu is about to start production on Juan Campanella's first animation movie. I'm doing mostly Python and pyqt scripts (some scripted plugins too) and very little mel.
This is the imdb page for the movie , and this is the website of the company (there in not much info there, but you can check it anyway) .
viernes, 1 de octubre de 2010
Rigging for Mexsana
I worked with Reino for Mexana commercials. Once again with Niko Rossi who took care of the face rig while y did the body rig and skinning. Congrats to my friends at Reino!
You can see some of it in this link or this other link to Niko's Vimeo.
REINO - mexana Ladrones from nicolas rossi on Vimeo.
REINO -mexana ladrones from nicolas rossi on Vimeo.
viernes, 10 de septiembre de 2010
This is a really cheap face capture!
Hey, I was messing around with a webcam and some sticker,
and the result was quite fun...
The face rig is from Jason Osipa!
Cheers,
Eduardo
and the result was quite fun...
The face rig is from Jason Osipa!
Cheers,
Eduardo
cheapest mocap ever from eduardo grana on Vimeo.
domingo, 5 de septiembre de 2010
RZ2 importer script for autodesk maya

Hey, I made this to import 2d tracks ( .RZ2 files )from movimento 1.0,
feel free to use it if you need it!
Of course it's super beta version, documentation is non existing and feedback is super welcome!
eg_movi.zip
Quick help: press the button with the ... to browse for the rz2 file. The List will show you the tracking points you have in the file.
Select the ones you want to import and click import selected, or click Select all to import all listed.
You have options for adding a prefix (in case you want to import some point more than once without having name clashes), scale the movement of the points, change the start frame for the animation, flip y axis (screen coordinates are flipped on y) and you can choose to make locators or trackPoints with the data.
On top it shows the current time unit, if you right click it, you have a popup menu to change it with or without compensating the keyframes (very handy!!)
aaa! almost forgot...
to run it:
source "c:/fullPathToTheScript/eg_movi.mel";
eg_movi;
Cheers!
Eduardo.
miércoles, 1 de septiembre de 2010
Rigging for Wow's Sindol
I worked with WOW for Sindol's commercials. I did all the rigging and facial setup for the character. It's a little rough, but it was done in one day. Go WOW studio!!!
You can see some of it in this link to Andres Bueno's Vimeo, who did the animation.
Animación 3D - Comercial "Sindol" from ANDRES BUENO on Vimeo.
domingo, 1 de agosto de 2010
Pipeline Tools for Muu Cine.
Muu Cine is one of the biggest advertising studios in Buenos Aires, and they trusted me and Lorenzo Basurto to develop several pielien tools to improve their productivity, and to keep track of their projects. The project was fully developed in python.
You can see who are this Muu people in this link to Muu!.
jueves, 1 de julio de 2010
Rigging for Clemente's World Cup Stuff
Clemente, the character created by Caloi is coming back to the small screen for world cup 2010! I've been working with WOW Studio to do some rigging for the characters and props of these animated shorts. Hope you like it!
You can see some of the videos in this link to El hincha oficial.
Maybe 'El Hincha Oficial' channel is dead...I'll embed another link
You can see some of the videos in this link to El hincha oficial.
Maybe 'El Hincha Oficial' channel is dead...I'll embed another link
Suscribirse a:
Entradas (Atom)